Unit Testing Behavior of React Components with Test-Driven Development

The internet is full of excellent examples of how to unit test React components that have purely presentational concerns. This is fairly easy to accomplish using Jest’s snapshot testing. But what about testing React components that leverage lifecycle methods? Maintain internal state? Have side effects, such as calling setTimeout() or setInterval()?
Testing components that are not purely functional and are responsible for behavior isn’t difficult, but there aren’t as many resources on the web that describe how to do this. This article will show how to unit test these more complex React components. We will use a test-driven development (TDD) approach, writing our tests first.
Example Use Case
Say we have a loading indicator component that we want to display when a request for data is in flight. If the data loads really quickly, we want to avoid briefly flashing the loading indicator for a split second. Our product manager has advised us that it would provide a smoother user experience if the user saw nothing at all for that split second before the data loads. So, we’d like our loading indicator component to wait 200ms before actually rendering the loading indicator. If less than 200ms have elapsed, we want to render nothing.
Tools
For this article, we will be using the Jest testing platform. Enzyme is a JavaScript testing utility for React that provides a way to render a React component in our unit tests and make assertions about its output and behavior. When using Enzyme with React, we need an adapter corresponding to the version of React we are running. In our example, we will use enzyme-adapter-react-16
Setup
The example code for this article is available in this repo. Each commit in the repo maps to a step in this article. The repo uses create-react-app which is already instrumented with a Jest test runner. You can clone the example repo and follow along with the steps here.
Our first step is to get a test running and failing. We’ll then implement the code to make that test pass.
Use npm or Yarn to install these packages if your project isn’t already using them.
npm install — save-dev jest enzyme enzyme-adapter-react-16Follow these steps to configure Enzyme to use the relevant React adapter in your project. This step is implemented in this commit in the example repo.
To run the tests in interactive watch mode in the example repo you’ll need to install Watchman
Run the test watcher:
npm testIf you prefer to run the tests manually without watching, then Watchman isn’t necessary.
CI=true npm testWe haven’t added any tests yet, but create-react-app provides one basic test. At this point you should see something like this when you run the tests:
PASS  src/App.test.js
  ✓ renders without crashing (24ms)
Test Suites: 1 passed, 1 total
Tests:       1 passed, 1 total
Snapshots:   0 total
Time:        0.612s
Ran all test suites.
Requirements
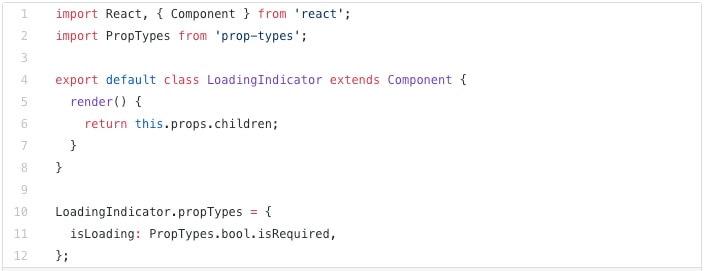
Our component is going to take a single boolean prop: isLoading.
When isLoading is false, we will render the component’s children.
When isLoading is true…
- If 200ms have elapsed, we will display text to indicate that we are “loading”.
- If 200ms have not yet elapsed, we will display nothing.
Implementation Steps
Let’s start our TDD cycle.
Create Component and Initial Failing Unit Test
Our next step is to create a file that exports a component and a unit test for it. Once we have a failing unit test, we can add the target behavior to our component and make it pass. This step is implemented in this commit in the example repo.
Let’s start with the simple case that renders the children when isLoading is false. We’ll create a file for our component, starting with a class-based component that renders nothing:

Let’s create a file for our unit test. We’ll add a test to validate that children are rendered when isLoading is false.

When we don’t need to be concerned with lifecycle methods or children, Enzyme’s shallow() function allows us to isolate the component we want to test, ensuring that children are not rendered in our unit test. Since we want to validate that the component’s children are rendered, we use Enzyme’s mount() function to mount the component in the DOM in our test-running environment so we can make assertions about it.
We don’t want to leave our test component mounted in the test environment’s DOM, so we call unmount() to clean up after our assertions.
Our test runner should now show a failing test that looks something like this:
PASS  src/components/LoadingIndicator.test.js
FAIL  src/components/LoadingIndicator.test.js
  ● LoadingIndicator › when isLoading is false › should render children
expect(received).toEqual(expected)

    Expected value to equal:
      "ahoy!"
    Received:
      null

    Difference:

      Comparing two different types of values. Expected string but received null.

      at Object.it (src/components/LoadingIndicator.test.js:13:30)
          at Promise ()
      at Promise.resolve.then.el (node_modules/p-map/index.js:46:16)
          at
Test Suites: 1 failed, 1 passed, 2 total
Tests:       1 failed, 1 passed, 2 total
Snapshots:   0 total
Time:        0.556s, estimated 1s
Ran all test suites.
If you’re seeing a test failure in your project that doesn’t look similar, ensure you’ve correctly configured Enzyme, and that your Jest testEnvironment is the default jsdom.
Render Children to Get Failing Test to Pass
This step is implemented in this commit in the example repo.
Getting this test to pass is super easy; we simply change our render method to return this.props.children instead of null. This obviously isn’t the correct implementation in light of our other requirements, but in the spirit of TDD, we write the minimum amount of code to get the test to pass.
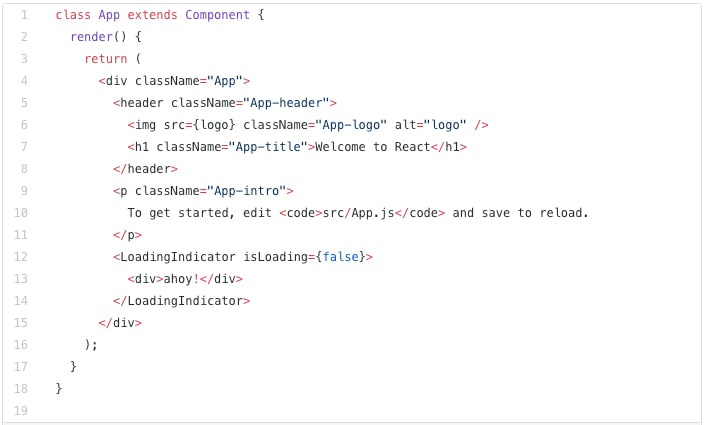
We’ll also add code to App.js in the example app so we can see our component render in the browser.
Run the example app with npm start— this will run a local web server on port 3000 and open a browser window pointing to it.
Add Test for Displaying Nothing When 200ms Haven’t Elapsed
This step is implemented in this commit in the example repo.
Let’s move on to the next easiest part of our spec. When isLoading is true, if 200ms have not yet elapsed, we should display nothing.
Let’s add the following test:

We should now see that test failing:
FAIL  src/components/LoadingIndicator.test.js
  ● LoadingIndicator › when isLoading is true › given 200ms have not yet elapsed › should render nothing
expect(received).toBe(expected)

    Expected value to be (using ===):
      null
    Received:
      "ahoy!"

    Difference:

      Comparing two different types of values. Expected null but received string.

      at Object.it (src/components/LoadingIndicator.test.js:26:32)
          at Promise ()
      at Promise.resolve.then.el (node_modules/p-map/index.js:46:16)
          at
      at process._tickCallback (internal/process/next_tick.js:188:7)
PASS  src/App.test.js
Test Suites: 1 failed, 1 passed, 2 total
Tests:       1 failed, 2 passed, 3 total
Snapshots:   0 total
Time:        1.495s
Ran all test suites.
Render Null to Get Test to Pass
This step is implemented in this commit in the example repo.
To get this test to pass, we return null when isLoading is true.
Our render() method now looks like this:

And our tests should all be passing again.
Add Test for Displaying Loading Indicator if isLoading is true and 200ms Have Elapsed
This step is implemented in this commit in the example repo.
This is where things get more interesting. We’ll need to keep track of whether or not our delay period has elapsed in our component’s internal state. We’ll use setTimeout() to schedule an update to the state to indicate that our delay period has elapsed. We need to use component lifecycle methods to trigger when to set and clear the timeout.
Since we need the full component lifecycle and environment runtime methods setTimeout() and clearTimeout(), we’ll use Enzyme’s mount() function as we have been thus far. We don’t want to actually wait 200ms in our tests, so we’ll use Jest’s timer mocks to mock out setTimeout() and clearTimeout().
Let’s add the following test:
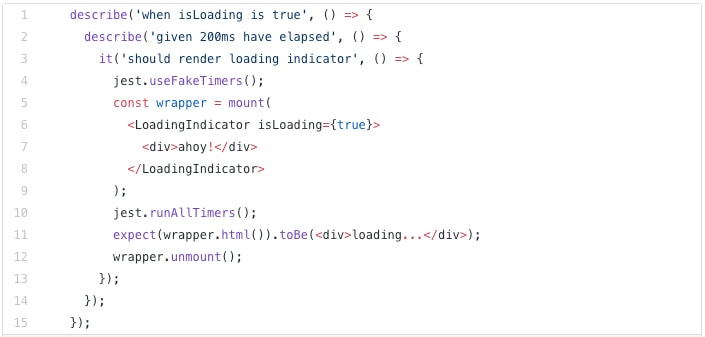
Note the usage of Jest’s timer mock methods.
- We call
jest.useFakeTimers()to tell Jest to mock out the time functions. - We call
jest.runAllTimers()to fast forward time to after thesetTimeout()period has elapsed.
In our simplified example, our loading indicator markup is simply:
loading…We should now see this test failing:
FAIL  src/components/LoadingIndicator.test.js
  ● LoadingIndicator › when isLoading is true › given 200ms have elapsed › should render loading indicator
expect(received).toBe(expected)

    Expected value to be (using ===):
      loading...
    Received:
      null

    Difference:

      Comparing two different types of values. Expected object but received null.
Implement Scheduling State Update to Get Test to Pass
This step is implemented in this commit in the example repo.
We’ll add default state to our component using a class property. When the component first mounts, we are not past the delay period, so the default value is false.

Let’s add a componentDidMount() lifecycle method so we can schedule an update to the state when the component mounts. After the delay period of 200ms has elapsed, we update the state to indicate that isPastDelay is true. We hold on to the value returned by setTimeout() in this._delayTimer so we’ll be able to clear the timeout later.

We also need to update our render() method with the logic to:
- Display nothing only if we’re not past the delay period.
- Display the loading indicator if we are past the delay period.

The full component class is now as follows, and our tests are all passing again.

Add Test to Validate Delay Period
This step is implemented in this commit in the example repo.
With our current implementation, we are not ensuring that we have the correct delay period. To illustrate this, if we change the timeout to 100, our tests still pass.

We can use Jest’s mock functions to ensure that setTimeout() is being called with the right values. Let’s update our test to add assertions about the calls made to setTimeout() via setTimeout.mock.calls.

Our test should now be failing.
FAIL  src/components/LoadingIndicator.test.js
  ● LoadingIndicator › when isLoading is true › given 200ms have elapsed › should render loading indicator
expect(received).toEqual(expected)

    Expected value to equal:
      200
    Received:
      100
Correct Delay Period to Make Test Pass
This step is implemented in this commit in the example repo.
Updating the timeout period back to 200 now makes our test pass.

Add Test to Ensure We Are Clearing Timeout
This step is implemented in this commit in the example repo.
Our component now implements all the functional requirements we’ve defined. With setTimeout(), our handler function, along with everything it closes over, will be garbage collected once the timer elapses. If our component used setInterval(), the handler function and its closure wouldn’t be garbage collected until we cleared the timeout. In that case, we’d introduce a memory leak if we didn’t clean up after ourselves. While it’s not strictly necessary in our case, it’s a good practice to ensure we clean up any timers we set.
Let’s add a test to ensure we’re clearing timeout:

Our test should now fail:
FAIL  src/components/LoadingIndicator.test.js
  ● LoadingIndicator › on unmount › should clear timeout
expect(received).toEqual(expected)

    Expected value to equal:
      1
    Received:
      0
Clear Timeout to Make Test Pass
This step is implemented in this commit in the example repo.
We add a componentWillUnmount() lifecycle method and clear the timeout there.

Our tests are passing again.
Add Test to Ensure We Are Clearing the Right Timeout
This step is implemented in this commit in the example repo.
Our current test does not validate that we are passing the right argument to clearTimeout(). To illustrate this, remove the argument passed to componentWillUnmount(). Our tests are incorrectly still passing, even though we aren’t actually clearing the timeout.

We want to assert that the argument passed to clearTimeout() is the same value returned by our call to setTimeout() in our componentDidMount()method. In order to do this, we need to know the value returned by setTimeout(). Since we are using Jest’s fake timers in our test, setTimeout()is actually a mock function. We can instrument the mock setTimeout()function to return a predetermined value, using Jest’s mockFn.mockReturnValue(). Now we know what value to expect to be passed to clearTimeout(). We can then make assertions about this value — clearTimeout.mock.calls[0][0] is the first argument to the first call to clearTimeout().

Our test should now be failing:
FAIL  src/components/LoadingIndicator.test.js
  ● LoadingIndicator › on unmount › should clear timeout
expect(received).toEqual(expected)

    Expected value to equal:
      2
    Received:
      undefined

    Difference:

      Comparing two different types of values. Expected number but received undefined.
Fix clearTimeout Argument to Make Test Pass
This step is implemented in this commit in the example repo.
Changing our componentWillUnmount() method back to pass the timer argument makes our tests pass again.

In Browser Behavior
Our component is now well tested, but we still want to explore how it behaves in the browser.
In this commit, we update App.js to demonstrate the behavior of our component in the browser. If running the example app, observe that when you refresh the page, isLoading is set to true, and the loading indicator isn’t displayed until a split second later.

Summary
We use the Jest testing platform along with Enzyme to render React components in our unit tests and make assertions about their output and behavior.
When we don’t need to be concerned with lifecycle methods or children, Enzyme’s shallow() function allows us to isolate the component we want to test, ensuring that children are not rendered in our unit test.
When we want to validate that the component’s children are rendered, or if we need the full component lifecycle and environment runtime methods, we use Enzyme’s mount() function to mount the component in the DOM in our test running environment so we can make assertions about it.
When using mount(), be sure to call unmount() to clean up our test environment’s DOM after our assertions.
We use Jest’s timer mock methods to mock out setTimeout() and clearTimeout() and simulate changes in time in our tests.
We use Jest’s mock functions to ensure that setTimeout() is being called with the right values, and to instrument the mock setTimeout() function to return a predetermined value.
Acknowledgments
Thanks to Drew Bourne for the excellent suggestions in his peer review of this article.