How to write a check in 6 easy steps

If you can’t remember the last time you opened your checkbook, you’re not alone. With debit cards, credit cards, online banking and direct deposit, paper checks can seem like a thing of the past.
But writing checks can still be useful, if not required, sometimes. So if you need to write a check and find yourself wondering how to properly fill out each field, use this guide.
Key takeaways
- Checks generally come with preprinted information like the account holder’s name, address, check number, account number and routing number.
- You’ll need to fill in the recipient, date, amount, signature and memo fields.
- If you make a mistake, you can void a check. You may also need to provide a voided check for things like setting up direct deposit for your paychecks at work.
- Knowing your checking account balance can help you avoid bouncing a check or overdrawing your account.

Understanding a check’s format
It’s not complicated, but it helps to know a check’s format and everything that’s on it prior to filling one out for the first time. The parts of a check include preprinted information and empty fields, which you’ll need to complete each time you write a check.
Preprinted information typically includes:
- Account holder’s name and information: The name and address—and sometimes phone number—of the checking account holder linked to the check are usually printed in the upper left corner.
- Check number: The check number is typically in the top and bottom right corner of the check. It can help account holders keep track of how many checks they’ve used.
- Bank routing number and account number: The routing number and account number are a series of numbers usually on the bottom of the check, with the routing number on the left side.

The rest of the empty fields are used to write out a check. These include the following:
- Date
- “Pay to the order of” line for the recipient
- Dollar amount in numbers
- Dollar amount in words
- Memo line
- Signature line
How to write a check
It’s important to fill out your check accurately and without mistakes. Filling one out improperly might hold up the payment process. And any delays could result in past due fees for certain bills.
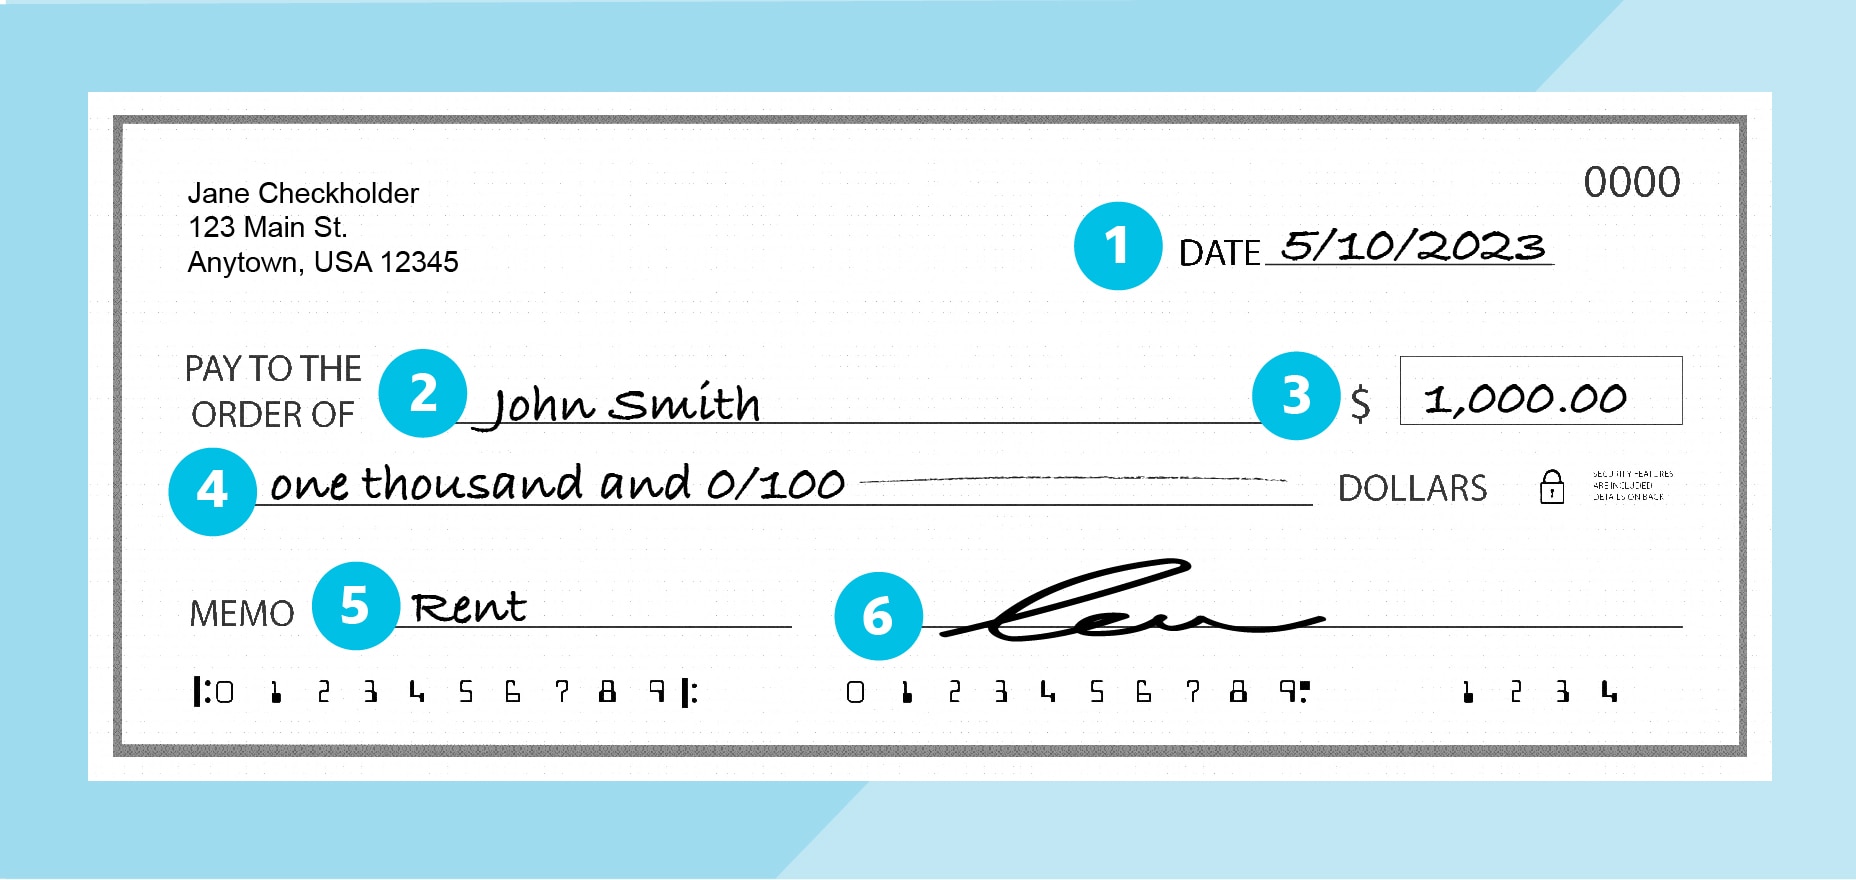
1. Date the check
Make sure your check reflects the current date—and write it in the top right corner. Backdating a check occurs when a previous date is used. It’s typically not allowed, and it may even be illegal in some situations.
A postdated check, which has a future date, might be legal in some instances, but it could be deposited before the date listed on the check. And that can result in a bounced check or overdraft fee if you don’t have enough funds in the account.
2. Fill in the recipient’s name
The recipient, also known as the payee, is the business, organization or person to whom you’re writing a check. The field for the recipient’s name usually begins with “Pay to the order of.”
Make sure this field is filled out correctly with the recipient’s full name. Incorrectly spelling the name of the person, organization or business—or leaving off part of a payee’s name—could result in your check being returned.
3. Write the dollar amount in numbers
There are two places where you need to list the dollar amount of your check in both dollars and cents. The first location for the payment amount is to the right of the recipient’s name. It’s typically a small box for numerals only and usually begins with a dollar sign, so you don’t need to write one in.
Here’s how to write a check with cents:
- Use a decimal point in the small box—for example, if your check amount is $100, write 100.00.
- Here’s how to write $1,000 on a check: 1,000.00. Don’t forget to add the comma and the decimal point.
For the amount box, write in numbers large enough to fill the entire space to help prevent fraud.
4. Write the dollar amount in words
The second location for the dollar amount is directly below the recipient’s name. This larger field often ends with the word “dollars,” and the amount should be spelled out in words in this location. For example, if the amount of the check is $1,000, write “one thousand.”
To include the cents, use a fraction with “100” on the bottom. So if the check amount is $44.99, write “forty-four and 99/100.” Even if the dollar amount has no cents, it’s typically best to include a “00/100” for clarity. For example, if you’re writing a check for $1,500, write out “one thousand, five hundred and 00/100.”
When writing out the dollar amount in words, write the amount as far to the left as you can. Then draw a line through any remaining space to the right of the amount listed. That will help ensure the entire field is full, which can help prevent someone from changing the amount of your check.
5. Include a memo
Filling in a check’s memo line may not be required, but it can be helpful to write what the check is for. If the check is for a specific month’s rent or a particular service you’ve received, you can list that in the memo field. You might also put the invoice number there if you’re paying a bill.
6. Sign the check
Lastly, you’ll sign the check on the line in the bottom right corner. Your signature is one of the most important parts of a check. Without it, your check generally can’t be cashed or deposited.
Tips for correctly writing a check
Before you write a check, here are a few tips to consider:
- Use a pen. By writing the check with a pen, you may reduce the risk of someone altering the check or changing the amount of money you’re paying someone.
- Write legibly. Print is often easier to read than cursive. Write in print on each blank field, except your signature field, so the person cashing or depositing the check can read it clearly. This may reduce errors and could help you avoid payment delays.
- Don’t sign a blank check. Always fill in the name of the recipient and the amount prior to signing. Doing so may reduce the risk of check fraud.
- Double-check your work. Ensure everything is correct before you submit the check.
How to void a check you’ve already written
Mistakes happen. And if you make an error when writing your check, you may want to void it. This could prevent others from using the check and help protect you from fraud. To void a check, write “VOID” across the entire check and start over with a new check.
There are other reasons to void a check besides making a mistake. For example, you may need to provide a voided check to set up direct deposit for your paychecks at work.
How to write a check to yourself
You can write a check to yourself in a couple of ways. You could write your name as the recipient and deposit the check into another bank account. Or you could make the check payable to “cash” and cash the check.
While it’s possible to write a check to yourself, be aware that banks and credit unions may charge a fee or refuse to cash the check if you don’t have an account with them. To avoid these issues, you might want to consider using other ways to move your money, like ACH transfers or money transfer apps.
Tips for using your checkbook
Now that you know how to write a check, here are a few tips you may want to follow to keep your checkbook secure:
Know your checking account balance
You can avoid bouncing a check or overdrawing your account by keeping tabs on your checking account balance. If you need a check with guaranteed funds, consider a cashier's check. While there are digital tools available to help with balancing your checkbook online, it’s not a bad idea to keep a paper copy as well.
Most checkbooks come with a checkbook register—also called a balance book. A checkbook register is a way to stay up to date on your account balance. Every time you write a check, update your checkbook register. You can then compare the paper copy to your online balance and ensure there are no discrepancies.
Keep your checkbook safe
You likely do everything you can to keep track of your credit card and avoid letting it fall into someone else’s hands to reduce the risk of credit card fraud.
A lost checkbook can also lead to problems, including check fraud. So it’s important to keep your checkbook in a safe place and protect it like you would a debit or credit card. If you ever lose your checkbook, it’s a good idea to contact your bank or credit union immediately so they can help you secure your account.
Writing a check in a nutshell
Checks might not be as popular as they used to be, but knowing how to write a check is helpful. And keeping a checkbook handy can be a good idea in case you need to fill out a check for bills and other expenses.
If you’re interested in getting rewarded for purchases, you can compare rewards cards from Capital One to explore your options. If you want to see which cards you’re eligible for, you could see if you’re pre-approved without hurting your credit.