How Capital One is Using Angular Elements to Upgrade to Angular

At Capital One, a large part of our major servicing platform is built with AngularJS, and we are continually adding new features to our platform everyday. In July 2018, active feature development for AngularJS came to an end and entered into Long Term Support (LTS). Because of this transition, we put urgency behind our planned migration from AngularJS to Angular. In order to accomplish this migration successfully, we are developing a process to upgrade and build new features in a modular way, while not impeding the continual development of our platform. To achieve this, we are using Angular elements as a migration tool.
Before we dive in, this article assumes that you have general knowledge and understanding of AngularJS, Angular, and various upgrade strategies.
Some of you might ask, “Wait, why Angular elements? Why aren’t you using the ngUpgrade approach instead?!?!”. These are completely valid questions.
NgUpgrade is Too Brittle
The UpgradeModule library does not allow for multiple development teams to contribute to the same repository while upgrading simultaneously. More specifically, having two AngularJS components being upgraded on the page at the same time is not possible from a technical standpoint with ngUpgrade approach. This would have prevented our development efforts from being scalable and independent while on a large platform with many contributors.
The UpgradeModule uses the AngularJS $injector to register Angular components. This allows for both frameworks to communicate with each other during the upgrade/downgrade process. However, because we have multiple teams upgrading their own features — with complex dependency graphs — this creates risk. Teams would need to compete for namespace within the $injector, and coordinating an upgrade schedule would be next to impossible.
Additionally, the UpgradeModule tightly couples the two frameworks together, causing performance impacts when either frameworks’ lifecycle hooks are invoked. For example, if the AngularJS $digest cycle is triggered by an ng-click event, Angular will go through a full change detection cycle. Similarly, if an Angular change detection cycle is triggered by a (click)event, AngularJS will go through a full $digest cycle.
For those reasons, we do not find ngUpgrade to be a viable upgrade strategy for our use case. Instead, we needed something flexible, reliable, and decoupled from our existing application so they would not impact our other development teams.
But what could that possibly be?
Enter: Angular Elements

Back when Angular v6 was released, Rob Wormald gave an exciting talk at NgConf 2018 that touched on the advancements web components (a set of DOM APIs that encompass custom elements) and listed a number of reasons how Angular could empower developers to create highly portable, web framework-agnostic widgets. The advantages of this approach are:
- Consume it anywhere — Angular elements can be consumed anywhere in a browser, regardless of framework.
- Use state management via dependency injection — We can utilize the dependency injection system that Angular provides to link any elements on the page to any state management store of your choice. This is accomplished by exposing the injector on the window object when Angular bootstraps. (We’ll go into more depth on this later.)
- Content projection works — As long as the content projection is rendered with the page for the first time, everything will work. Additionally,
ContentChildandQueryList(and their plural forms) were designed for static consumption; these features aren’t ready for a dynamic world just yet. The Angular team has plans to tackle this in the near future. - Styles are scoped to the element —
ViewEncapsulationis essentially using the shadow DOM. Elements should useNativemode so that styles don’t leak throughout the page. (Note: We opted to useNonein our implementation because we are deliberately reusing styles that we’ve designed for our elements and legacy code.) - Supports most major browsers — Elements is supported anywhere that Angular is supported. Be sure to include the same polyfills that are normally required. It even works in Internet Explorer as far back as ~IE9.
- Everything is sandboxed inside — Elements function completely on their own. This means there is no tight coupling between the
$digestcycle andngZonefor change detection. That directly translates to zero performance impacts!
With the versatility of elements, the availability of the dependency injection system, and autonomy, elements solved many of the issues that ngUpgrade would have introduced. Now we have an approach that can enable multiple development teams to work independently at their own pace when migrating features.
That’s Nice and All, But What’s Next?
Now that we have an approach for converting features to elements, we need to identify a way for developers to convert elements to a pure Angular page. Some developers have highlighted two common approaches for converting features: Vertically (e.g. by route), or horizontally (e.g. by feature). With elements, we have the luxury of using both approaches, and having that luxury has led us to three fundamental phases to migrate fully:
- Select a simple feature from the existing AngularJS application.
- Convert an entire page’s features to elements.
- Convert all new elements to an Angular route, making them pure Angular.
Phase 2 is the most flexible since it can be implemented vertically and horizontally at the same time. Below are two general approaches to this phase:
- Designate a single element that hosts the converted features. Once everything is in the element, it can be converted to an Angular route:
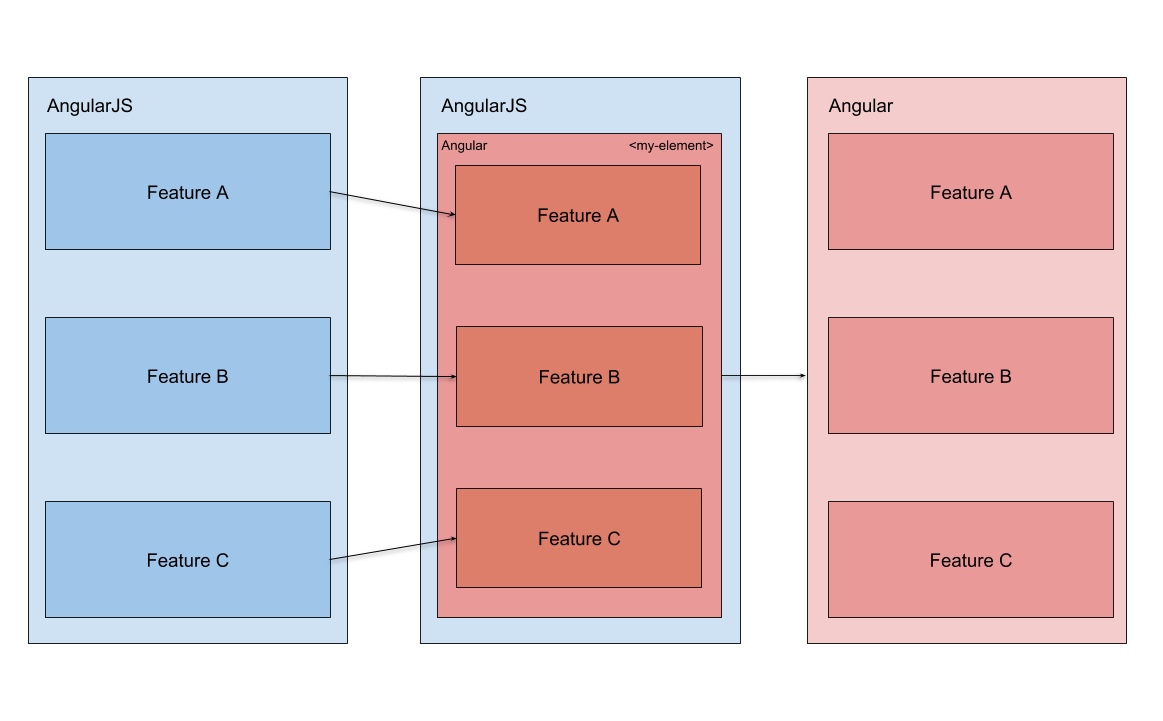
2. Designate an individual element to host each feature:

Although the three phases lean towards a more vertical migration pattern, it is not a requirement to do so.
It’s important to avoid consuming an element inside another element, and consuming an element in the root Angular application. While this form of element consumption is possible, it introduces additional technical complexity with loading element bundles to the application. Build processes would have to accommodate nested elements and their reference to their final build bundles. This single complexity can quickly increase cognitive load, resulting in a poor development experience. An alternative to embedding an element within another element could be as simple as building regular Angular feature components that interact with each other, then wrap all those components in a single element shown in the first approach from above.
There are numerous ways that elements can be used when migrating. We found that these two approaches were the most straight forward and applicable to our situation. Be sure to pick the simplest option that works for you.
Before we get ahead of ourselves, there are a few design decisions that were made to facilitate this approach.
Application Structure
In order to convert elements to pure Angular routes, we needed to do some architectural plumbing to get things moving:
- Two frameworks, two strangers — Both frameworks coexist on the page, but do not know of each other.
- Angular is bootstrapped first — We first bootstrap a standalone, root Angular application at the top of the page, then bootstrap our existing AngularJS application. This is done as soon as possible in order to expose Angular’s Injector to wire-up any state management facilities necessary before any elements are initialized.
- Render UI in the same place — The AngularJS
<ui-view>and Angular<router-outlet>tags live as siblings in the main content area. This enforces the AngularJS header and footer as a wrapper; and subsequently, those will be the last features migrated. - Maintain separation of concerns — When on a route handled by AngularJS, the
<ui-view>is responsible for rendering any templates that could include element features, while the Angular route renders nothing. Conversely, when an Angular route is activated, AngularJS shows nothing, and the<router-outlet>takes over for rendered content.
At the top level, we have both AngularJS and Angular frameworks running in parallel with each other. Each framework has its respective router tag living adjacent to each other. As we convert features to elements, then elements to Angular routes, we will need to ensure that nothing is rendered by AngularJS for Angular routes, and vice versa.
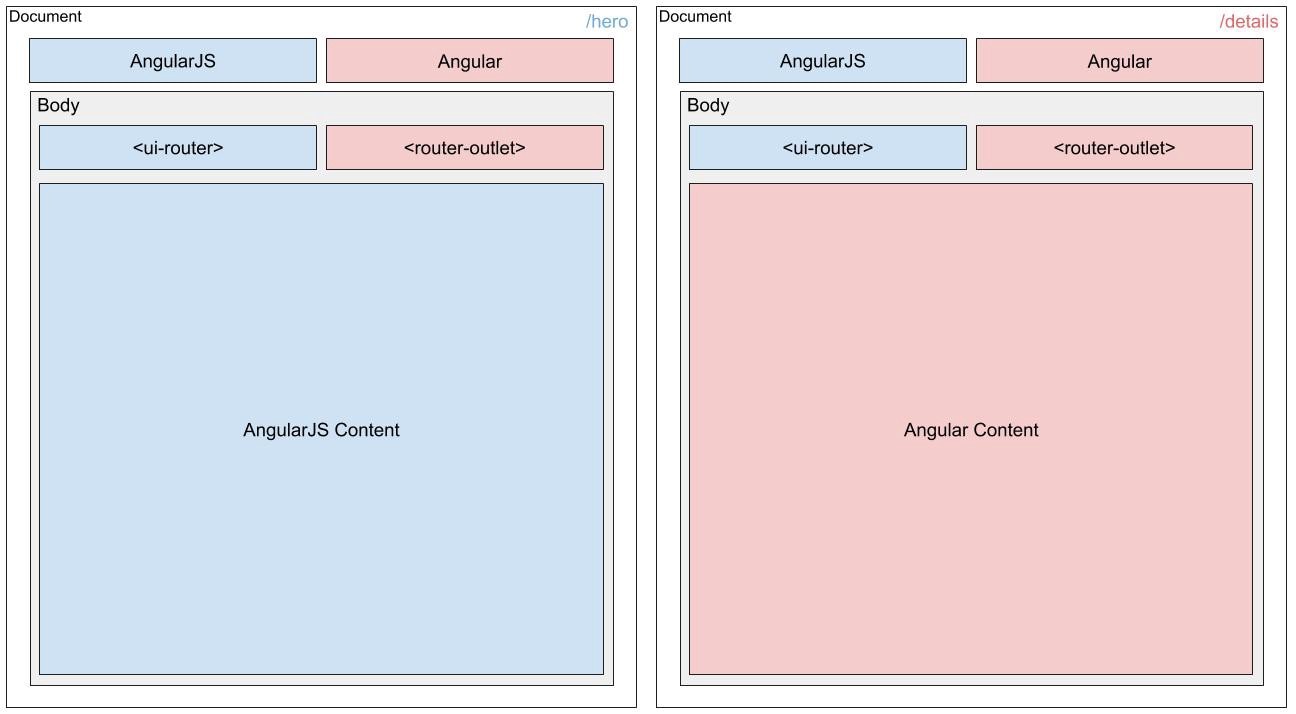
On the left, the /hero route is handled by AngularJS and is rendering all of the blue content area. During this state of the browser, the Angular side does not have a route defined for it, so it defaults to rendering a component with a blank template:
/app.module.ts
--------------------------------------------------------------------
@Component({
   template: ‘’
})
export class EmptyComponent {}
. . .
RouterModule.forRoot([
  {
     path: 'details',
     component: HeroDetailsComponent
  },
  {
     path: ‘**’,
     component: EmptyComponent
  }
])
When the route is on /details, the Angular router takes over and renders all the content in the red content area. At the same time, AngularJS doesn’t have a route defined for /details, so it will default to render nothing:
/app.js
--------------------------------------------------------------------
const heroState = {
   name: 'hero',
   url: '/hero',
   templateUrl: './hero.html'
};
const emptyState = {
   name: ‘empty-state’,
   url: ‘/*path’,
   template: ‘’
};
$stateProvider.state(heroState);
$stateProvider.state(emptyState);
Creating an Angular Element
Now that we have established the process of converting features into Angular, let’s talk about how to actually create an element. If you’ve ever gone through the process of creating your own, this process can be a huge pain point, especially if you need to create multiple elements. The general process of creating and consuming an element goes something like this:
- Create a new
NgModulethat will act as the host of the custom element. - Define a component as the
entryComponentin the newNgModulehost. - Wire up any state management on the Injector.
- Grab a reference of the component and define it as a
customElement. - Build the element with the CLI and/or custom builders.
- Include the new bundle into the
index.htmlof the root application. - Consume the new custom element anywhere.
This is the general process for our use case. However, depending on the scenario, there may be some steps that may be added or removed. Going through this process can be very time consuming and error-prone. So let’s use a newer feature to help automate that process to remove as much human error as possible!
Angular Schematics to the Rescue
Also with the release of Angular v6, schematics were introduced that enabled developers to harness the “secret sauce” that powers the Angular CLI under the hood, but for their own personal use cases. Angular schematics are essentially a set of APIs that empower developers to create instruction sets for manipulating the filesystem.
Since creating a custom element is pretty involved, we turned to schematics as the perfect solution for scaffolding out new elements, then “unwrapping” them once we are ready to convert the work to an Angular route. This solution reduces the seven steps listed above into a single command! Not only does this streamline the process, but it creates a standard, repeatable procedure that developers can follow. Now they can focus on building new Angular code rather than the intricacies of wiring up a new element.
Schematics are incredibly flexible and accommodate a variety of use cases we’ve identified. Writing our own custom schematic helped eliminate the pain point of going through the manual process of creating and unwrapping elements during the migration process.
But now you might be wondering, “What if the feature I want to migrate depends on an AngularJS resource (e.g. factories, services, providers, constants, etc.) that hasn’t been converted yet?” Glad you asked!
Enter: The $injector
In order to re-use an AngularJS resource in the Angular context, we need to grab a reference to that resource. Earlier, it was mentioned that the UpgradeModule utilizes the $injector to hook into AngularJS, so we can do the same thing:
const $injector = (window as any).angular.element(document.body).injector();Grabbing a reference to the $injector gives us access to the APIs; more specifically, giving us access to the get() and has() methods. With these methods, we can create a top-level Angular service that grabs a reference to the AngularJS resource and inject it into any of our elements.
/angularJSResource.service.ts
--------------------------------------------------------------------
@Injectable({
 ...
})
export class AngularJSResourceService {
const $injector = (window as any).angular.element(document.body).injector();
getResource(name: string): any | null {
  return this.$injector.has(name) ? this.$injector.get(name) : null;
}
}
/my-element.component.ts
--------------------------------------------------------------------
@Component({
  ...
})
export class MyElementComponent {
// Grab reference to an AngularJS service
const weatherProvider = this.ngService.getResource(‘weatherService’);
constructor(private ngService: AngularJSResourceService) {}
}
In AngularJS, we register our dependencies as strings, so we can refer to them exactly as we defined them. Now we can freely use resources like factories, service, providers, constants, etc. within our element without having to convert the dependency to Angular first.
It’s important to note that even though we are using the $injector to get references of resources, we aren’t hooking into any AngularJS digest cycle hooks. This usage of the $injector doesn’t have any performance implications.
The State of the Upgrade
As of December 2018, we have migrated and launched our very first migrated feature as an Angular element to production and have seen overwhelming success. In order to measure the impact of our implementation, we are assessing usability through an A/B test that will help further determine our level of success, confirm zero functional differences with our customers, and navigate any unforeseen risk. In the unlikely event that we see production issues that stem from the element, we can safely turn the test off and proceed with business as usual with production code that already existed.
Capital One’s servicing platform will undergo a great transformation in the coming months. We anticipate that there will be many successes and lessons learned. Be sure to follow us through our journey as we continue to learn, grow, and utilize Angular elements in innovative ways.
I want to make a shout out to Peter Shao for helping to bring this blog post together.
Related: