Automate AWS infrastructure with Boto 3 - AWS instance tags
Automating AWS instance tagging with Python scripts: Part 1 of a 3-part series

Updated December 12, 2023
When I first joined a DevOps/SRE team, I realized many simple AWS infrastructure changes took up a large chunk of our engineering team’s time. I didn’t want to spend my valuable coding time on these manual, yet essential, tasks so I set out on a mission to automate them. Since I had wanted to build my Python scripting skills anyway, I discovered a way to solve two problems at once - using the software development kit Boto 3 to automate my simple, manual AWS tasks using Python.
This article is part one of a three-part series on how to automate AWS tasks using Python. In part two, I will discuss how to write a Python script to automate AWS health checks, and in part three, I share how to write a Python script to automate the creation of AWS Snapshots.
Why use Boto 3 to create Python scripts for AWS resources?
Boto 3 is your new best friend when Python scripts for AWS resources. According to the documentation, “Boto is the Amazon Web Services (AWS) SDK for Python. It enables Python developers to create, configure, and manage AWS services, such as EC2 and S3. Boto provides an easy-to-use, object-oriented API, as well as low-level access to AWS services.”
Before working with Boto3 it is important to correctly download and configure it. Check out their instructions on how to set your credentials.
Boto 3 makes it easy to get all the information you need from your AWS resources as well as to modify them. To get started with Boto 3, first create a Python file which will act as the script and import the SDK.

You can simply use it to create a “client” with the AWS resource you would like to extract information from or modify. Here I am creating a client for EC2 instances.

You can then use this client to perform any of the methods listed in the EC2 service section of the Boto 3 documentation. This documentation is super helpful in listing all of the resources you can use, their various methods, and how exactly to configure these methods. Feel free to explore!
To get the most out of learning about AWS scripting using Boto 3, I figured I would walk you through three different use cases (each in a separate article) to show why you may want to use Boto 3, and how to do so. In this, the first installment, we’re going to automate adding tags to instances.
Use case for AWS scripting using Boto 3
To get the most out of learning about AWS scripting using Boto 3, I figured I would walk you through three different use cases (each in a separate article, as we previously mentioned earlier in this article) to show why you may want to use Boto 3, and how to do so. In this first installment, we’re going to automate adding tags to instances.
Writing the Python scripts
Imagine you have hundreds of instances in your AWS account and you want to add a tag so that they will only run during certain times of the day. However, you don’t want to spend time manually adding the tag to every instance because that would take hours. Luckily, there’s an easy solution!
You can use Boto 3 to get the names of all instances in your account and then add the tag to each one.
1. First, create the EC2 client.

2. Identify the instance names
Next, we need to find the method that will help us find the names of our instances. Unfortunately, there is no method that simply lists the names of your instances. The closest thing to getting what we want is describe_instances().

This will return all kinds of information about our instances. What we are really looking for is simply the name, so we will have to sift through all of the data this returns to us.
But, after looking through all of the data, we still can’t seem to find the instance name… That’s because describe_instances() doesn’t give us the name! We actually want to use the InstanceId.
3. Identify the instance descriptions
We need to find the list that we actually want to parse through using a for-loop. Each item should represent an instance. In order to do that we need to see where all of the instance descriptions are located in the response. There we go!
![Python script example code: instances = response [‘Reservations’ ]](https://ecm.capitalone.com/WCM/tech/boto-3-instance-tags-6.png)
4. Looping through instances
Now we can loop through each instance in the list of instance descriptions that we’ve collected.
Notice that it prints a bunch of key metrics that we don’t really care about in the context of this problem. Let’s narrow it down to print the instance_id.

Now that we know how to find the instance_id for each instance in our account, let’s see how we would add a tag to an instance.
After looking through all of the methods available for EC2s it looks like create_tags would make the most sense for what we want to do.
5. Tagging methods
This method, according to the Boto 3 documentation, “adds or overwrites the specified tags for the specified Amazon EC2 resource or resources.” Notice you can add a completely new tag. Or, if you have one that already exists but has a wrong value, you can change that as well.
This method takes in a list of resources, meaning we need to save the instance ids that we collect in our for-loop.
![Python script code: instance_ids = [] for instance in instances: instance_ids.append)instance[‘Instances’][0][‘InstanceId’])](https://ecm.capitalone.com/WCM/tech/boto-3-instance-tags-8.png)
This is better! Since the create_tags method takes in a list of resource ids, we created an empty list and appended the instance id to the list in each iteration of the for-loop. Now we can use the list instance_ids as the value for ‘Resources’ in the create_tags method.
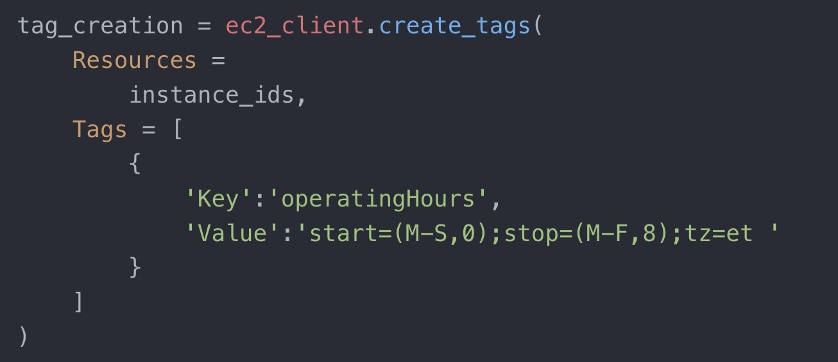
This will place a tag called operatingHours on all of the instances. If you want to apply this tag to a small subset of instances, then you can use the filter option with the describe_instances method you used earlier.
Output example
Here is an example. You can filter by security group name using the ‘group-name’ filter. This command would look for all instances that have the security group ‘security-test.’
Viola! Your operating hour tags are now added to all of your instances.
AWS resource management: Leverage Boto 3 for seamless scripting
Boto 3 emerges as an indispensable companion for Python scripting involving AWS resources. Functioning as the Amazon Web Services (AWS) SDK for Python, Boto 3 empowers developers to effortlessly create, configure, and manage AWS services, such as EC2 and S3. The SDK offers both a user-friendly, object-oriented API and direct access to AWS services at a low level.